Me again,
I tried your script Andreas, it’s working perfectly!
Since i made the subsetting before I don’t get any Memory-Errors here anymore because of the smaller file-sizes.
I included a part using MosaicOp$Condition as well and this also works fine.
Bennet
Edit: If I include too many files I of course get the HeapSpace Error again…so I split up and create several mosaics and mosaic the smaller mosaics again, hope its understandable
Hey,
I am trying to force snappy to open 10 m resolution of Sentinel-2 product but I don’t succeed. As abgbaumann said ProductIO.readProduct(file, "SENTINEL-2-MSI-10M-UTM35N") produces error RuntimeError: no matching Java method overloads found. I didn’t make it work with the solution for S3 at https://senbox.atlassian.net/browse/SNAP-343.
Can you help me out in case of S2? How to do it?
(I think that would be a solution to my problem of NDVI caluclation. I always get results in 60 m resolution. Instead of 1098010980 px, my result is always 18301830 px)
Thanks
How do you create the file variable?
I think it is a string, right?
That’s the reason why no java method can be found. When specifying the format, the file needs to be Java file object.
Do it like: ProductIO.readProduct(File(file), "SENTINEL-2-MSI-10M");
I think there is now specific- UTM-format for the 10m resolution.
But doing it like this will give you only the 10m bands.
Probably the best way to prepare the data is to read in the data in multi-size resolution format and then doing the resample to 10m.
Here I show how to do it.
The call to GPF.getDefaultInstance().getOperatorSpiRegistry().loadOperatorSpis(), which Andreas mentioned
is not necessary any more, since SNAP version 5.0.
Yes, I create file as string.
For ProductIO.readProduct(File(file), "SENTINEL-2-MSI-10M") what do I need to have File (Error message: ‘File’ is not defined) ? Is it from snappy import File or something else?
I will update SNAP and try everything and give feedback, but for now I see I’m using SNAP 3.0. I realised if I put
HashMap = jpy.get_type(‘java.util.HashMap’)
GPF.getDefaultInstance().getOperatorSpiRegistry().loadOperatorSpis()
after ProductIO.readProduct(File(file), "SENTINEL-2-MSI-10M") it works with 60 m resolution and if I put it before it works with 10 m resolution. It doesn’t mind if I stated SENTINEL-2-MSI-10M or SENTINEL-2-MSI-60M, it just doesn’t care. For 20 m resolution I would have no clue. Is it possible that it remembers something somewhere in memory? Is there any tool to clear before product.closeIO()? It’s just my guess.
One more question is that in the end I get NDVI for e.g. 10 m resolution, but no projection. Can I somehow read EPSG from my input file and write it to my output file, and if yes how?
Regards,
Milos
Why don’t you have any projection? How do you create the NDVI?
You can ask a product/band for a GeoCoding and copy it to your target.
You can use ProductUtils.copyGeoCoding(source, target);
I just didn’t have a line for projection at all. Now I have a projection, thank you for the answer.
In addition, I create NDVI as a new empty product and then fill it with data; I use band math expression.
Last in this round of questions, when I calculate NDVI using SNAP GUI I use tool Optical/Thematic Land Processing/ NDVI Processor. Resulting product has bit depth 128, and result from my code has 32 bit depth. In my code I stated ProductData.TYPE_FLOAT32. What should be stated in order to have a bit depth 128? Is there a list of supported formats given somewhere?
The ndvi band is of type float32. The ndvi_flags is of int32 and then there is the flag band of the source product.
Supported as band data type are
ProductData.TYPE_INT8
ProductData.TYPE_INT16
ProductData.TYPE_INT32
ProductData.TYPE_UINT8
ProductData.TYPE_UINT16
ProductData.TYPE_FLOAT32
I see 128 bit depth when I do right click/ Properties in My Computer on the tif file exported from SNAP GUI. That file has 919 MB size, and my tif file generated from my python code has 459 MB and bit depth 32.
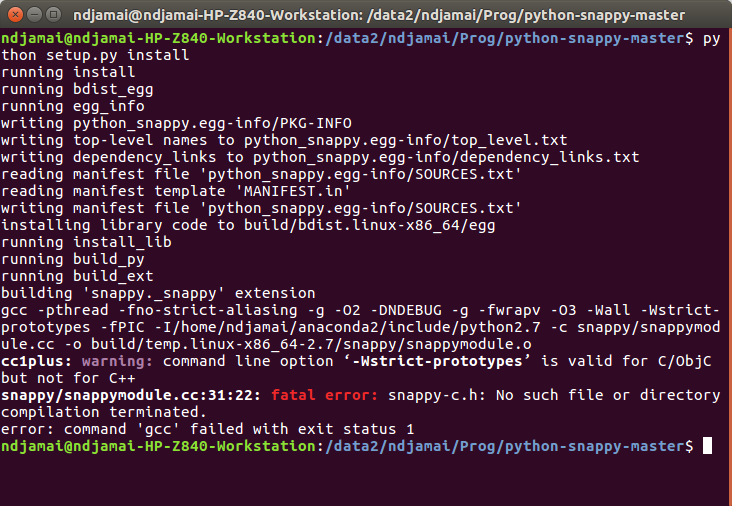
Hello,
I m trying to install snappy as explained in https://github.com/andrix/python-snappy
But, when is use this code: python setup.py install
I get this error message:
It seems you are using a different snappy.
This snappy in this forum refers to python binding for SNAP. It is not related to the Google compression library.
@Marpet: Regarding the comands you gave for information on the operators
“gpt -h Reproject” and “gpt -h”, where should I write them?
I’m using Eclipse as my python IDE, run through OSGeo. I tried the above comands both to the comand line of windows and to the comand line of OSGeo, as well as to Eclipse’s console but nobody recognises gpt.
I’m not an expert user so I would appreciate a detailed answer, if possible. Thank you.
I forgot to mention it but I’ve already installed snap with snappy, and I’ve copied tha snappy directory into the site packages of the python version I’m using. However I believe there is something wrong with the installation because, although when I import snappy in my script it doesn’t give me any error, anything else does. For example, with ProductIO I get: “from snappy import ProductIO
ImportError: cannot import name ProductIO”, so I guess it’s not only a question of gpt, but a bigger mess I should correct.
Anyway, just for the information, gpt should run from the windows command line, from the snappy directory?
gpt can be invoked from any location, if added to the path.
If this is not working you can go to the bin folder of SNAP installation directory and run it from there.
Thank you very much for your answer. Yes, this was the site I folowed. Re-installing was my deeper fear, since I really had a hard time either with the various python versions as well as with jpy, jpyutil and so on, but I’ll try to reinstall everything from the beginning, if you say it could work. I’m not sure python 3.4 is available in OSGeo. Right now I have 2.7 and 3.6 and probably I could get 3.7 but I’ve read that snappy is not ready yet for those, that’s why I was running in 2.7.
I will let you know how it will go. Thanks for your help anyway.
Here I am again. I resolved!!
I had to re-install everything (python, snap, snappy) and read better the instructions, because I had misinterpret some steps BUT now it works (with Python 2.7)!!!
Among other things, I had installed another snappy (there are lots of snappies out there) because I had used pip install instead of setup.py install and it had picked the wrong package…
Thank you so much for the help.
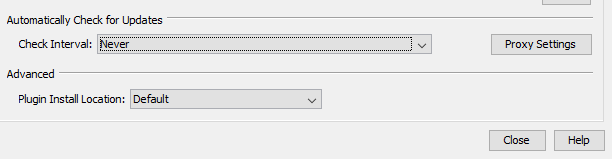
Just a silly question, is there a way to deactivate the snap updates on my computer? I’ve read some discussions of people whose installations got messed up when the versions changed and I would like to avoid it if possible…
Thank you again. Have a nice day!!!
Good that you have solved it
Yes, unfortunately there are multiple snappies.
We want to rename snappy. Probably to something like esa_snappy. But this will come in a future version.
Your SNAP installation is only updated with your interaction. You are only informed about updates but you have to initiate the update process.
But you can disable even the check for updates:
In the options you can set:
An in the settings tab of plugins dialog you can also disable the check for module updates: