Hallo Katherine.
This is really good work.
Am new to StaMPS
May you assist me know how you determined the time series graph
Hallo Katherine.
This is really good work.
Am new to StaMPS
May you assist me know how you determined the time series graph
Please have a look at this overview: About the STaMPS category
It provides a good starting point.
Hi @thho @katherine @ABraun
So in this sample How to prepare Sentinel-1 images stack for PSI/SBAS in SNAP 5
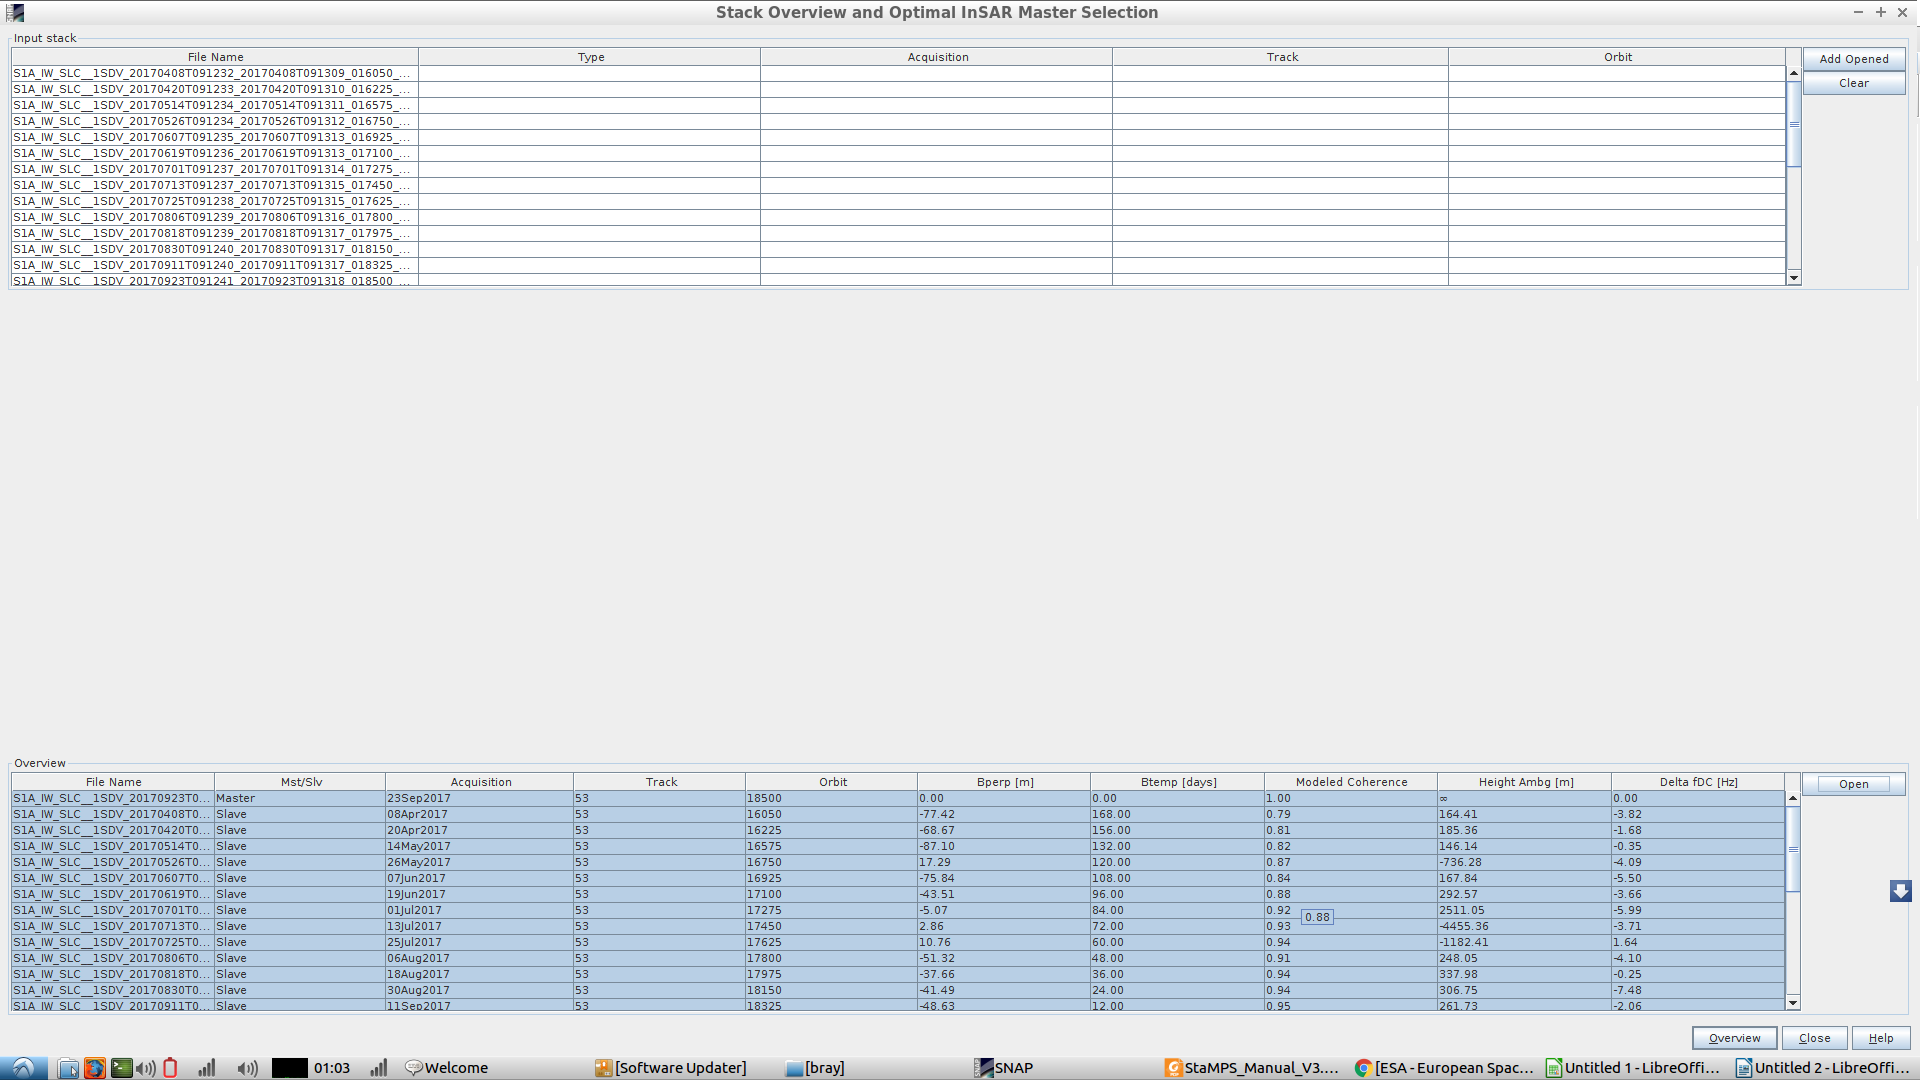
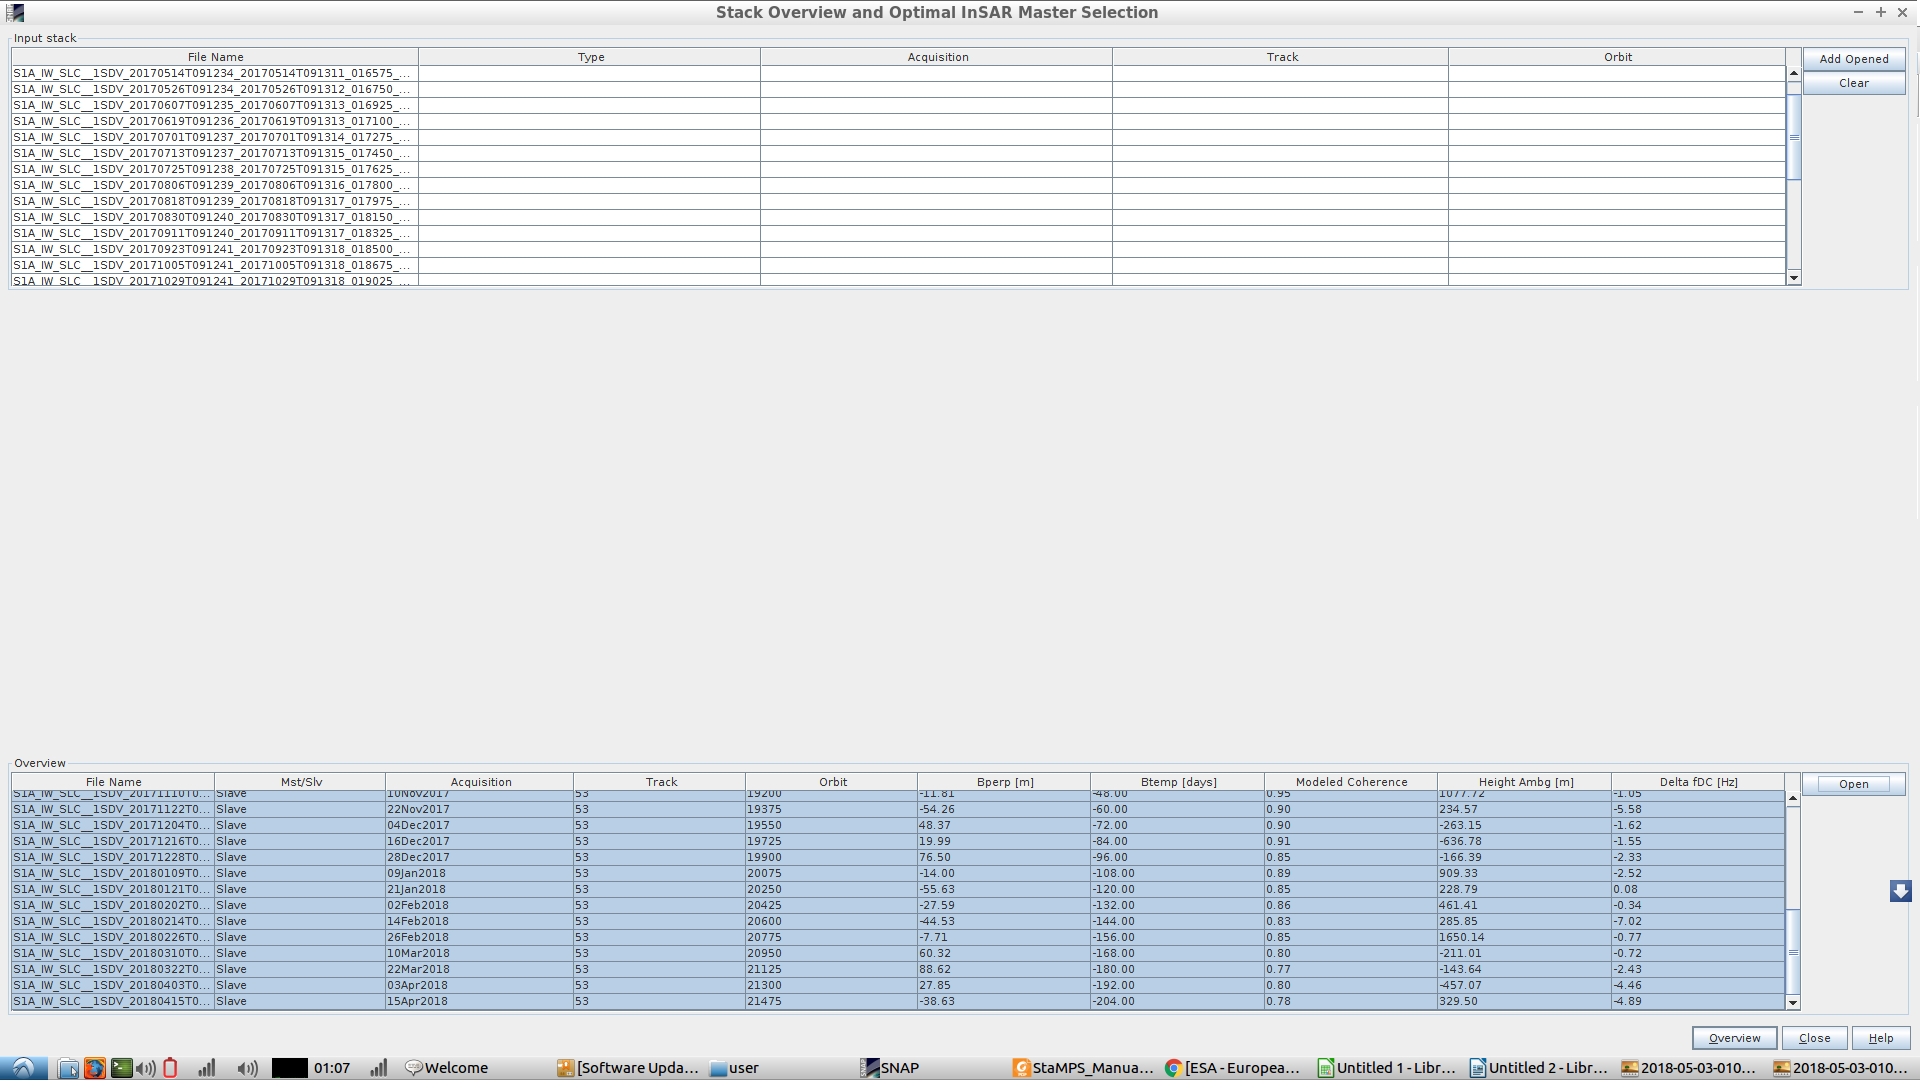
I use 12 Sentinel-1A I got 16000 PS after stamPS process. However recently I used 30 scene for the same area of study. The master selected is chosen by SNAP usin “InSAR Stack Overview”. However when doing stamPS process out of 500.000 (five hundred thousand PS candidate) stamps only chose 4000 PS the rest are weeded out. I use default parameters like my previous test and as @katherine suggested, although in her steps she recommended that if the data/interferogram more than12/13 to split the stack to two or more with same master but when I did this test I use all 30 data in one stack.
What may caused so many possible PS weeded out by StamPS?
Dear Daniel_bona,
This may be caused by poor coherence of images you added with the master image due to their big temporal baselines .
Katherine
but the master is selected based on SNAP recommendation. Althogh out of 30 scene there are 2 scenes that have 24 days interval, the rest are 12 days (Sentinel-1A revisit time).
so this is the baselines calculated by InSAR Stack Overview, maybe you can suggest which one that I should discarded from the stack?
Those with big temporal baselines. But it also depends upon your area of interest. Check coherence.
Katherine
but the data are from one year time period of course there are data with big temporal baselines.did you mean discard data with 24 days time interval, because normal revisit time for Sentinel-1A is 12 days.
Check coherence after interferogam formation?
Hello everyone,
I did not succeed in resolving my problem about the StaMPS export processing. Below I will describe you the steps I followed. Maybe you will find what is wrong.
I use SNAP 6.0
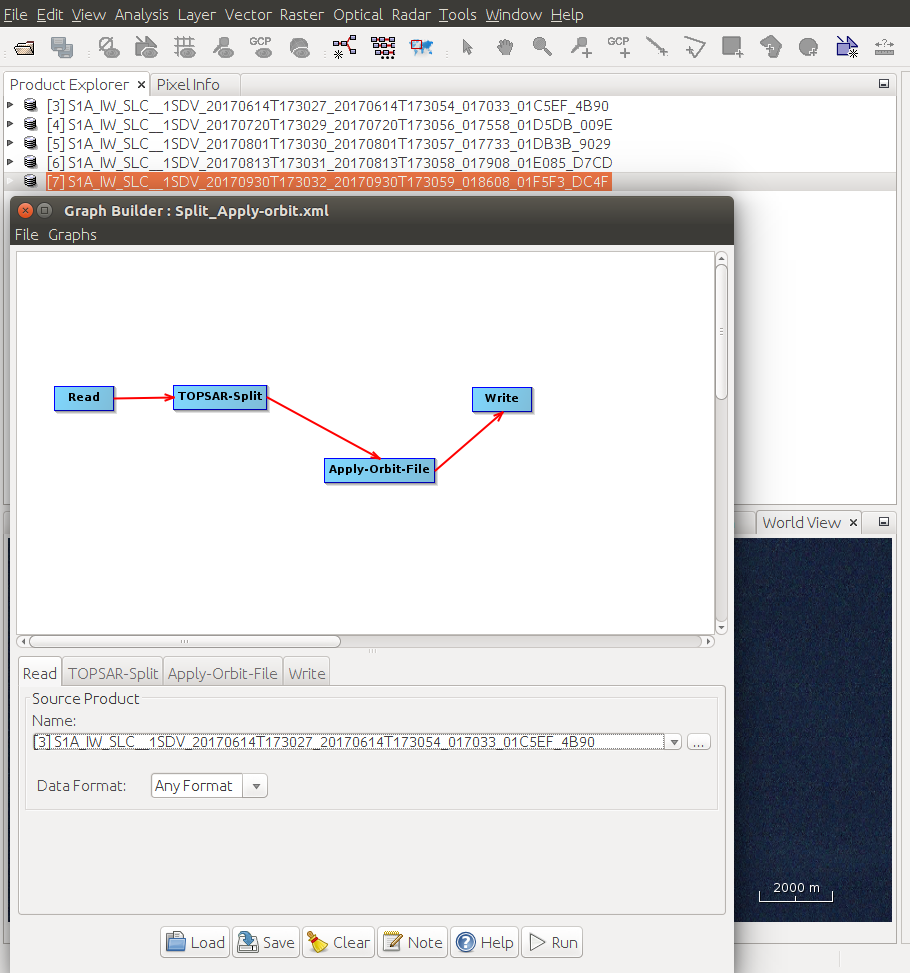
I use 5 SLC images from S1A. The first one is the master image.
S1A_IW_SLC__1SDV_20170801T173030_20170801T173057_017733_01DB3B_9029.SAFE
S1A_IW_SLC__1SDV_20170614T173027_20170614T173054_017033_01C5EF_4B90.SAFE
S1A_IW_SLC__1SDV_20170720T173029_20170720T173056_017558_01D5DB_009E.SAFE
S1A_IW_SLC__1SDV_20170813T173031_20170813T173058_017908_01E085_D7CD.SAFE
S1A_IW_SLC__1SDV_20170930T173032_20170930T173059_018608_01F5F3_DC4F.SAF
Step 1 : Split and Apply-orbit by using Graph builder
Output file :
S1A_IW_SLC__1SDV_20170801T173030_20170801T173057_017733_01DB3B_9029_Orb.dim
S1A_IW_SLC__1SDV_20170614T173027_20170614T173054_017033_01C5EF_4B90_Orb.dim
S1A_IW_SLC__1SDV_20170720T173029_20170720T173056_017558_01D5DB_009E_Orb.dim
S1A_IW_SLC__1SDV_20170813T173031_20170813T173058_017908_01E085_D7CD_Orb.dim
S1A_IW_SLC__1SDV_20170930T173032_20170930T173059_018608_01F5F3_DC4F_Orb.dim
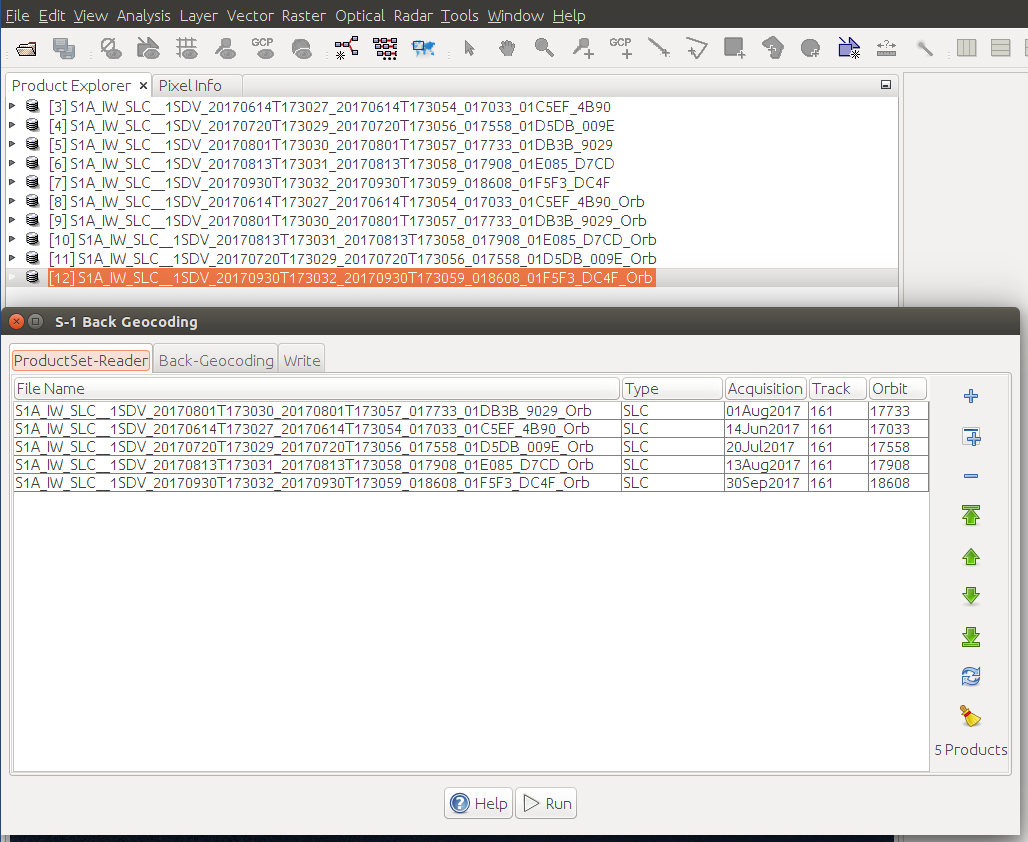
Step 2 : create a stack with Backgeocoding
Radar / Coregistration-S-1 / Tops_Coregistration-S-1 / Backgeocoding.
Output file :
S1A_IW_SLC__1SDV_20170801T173030_20170801T173057_017733_01DB3B_9029_Orb_Stack.dim
Step 3 : deburst by using Graph builder
Output file :
S1A_IW_SLC__1SDV_20170801T173030_20170801T173057_017733_01DB3B_9029_Orb_Stack_Deb.dim
Step 4 : create IFGs by using result of Step 2
Radar / Interferometric / Products / Interferogram formation
Output file :
S1A_IW_SLC__1SDV_20170801T173030_20170801T173057_017733_01DB3B_9029_Orb_Stack_ifg.dim
Step 5 : deburst result of step 4 by using Graph builder
Output file :
S1A_IW_SLC__1SDV_20170801T173030_20170801T173057_017733_01DB3B_9029_Orb_Stack_ifg_Deb.dim
Step 6 : Apply TopoPhaseRemoval to result of step 5
Radar / Interferometric / Products / Topographic Phase Removal
Output file :
S1A_IW_SLC__1SDV_20170801T173030_20170801T173057_017733_01DB3B_9029_Orb_Stack_Deb_ifg_dinsar.dim
Step 7 : add elevation band to result of step 6
Raster / DEM tools / add elevation band
Output file :
S1A_IW_SLC__1SDV_20170801T173030_20170801T173057_017733_01DB3B_9029_Orb_Stack_Deb_ifg_dinsar.dim
Step 8 : StaMPS export
Radar / Interferometric / PSI/SBAS / StaMPS export
SS1A_IW_SLC__1SDV_20170801T173030_20170801T173057_017733_01DB3B_9029_Orb_Stack_Deb.dim
S1A_IW_SLC__1SDV_20170801T173030_20170801T173057_017733_01DB3B_9029_Orb_Stack_ifg_Deb_dinsar.dim
And I get this error message :
Thank you for any help !
Guillaume
skip step 5-7, snap 6.0 already accommodate all the process required in interferogram creation.
you don’t need to deburst the interferogram again.
check this manual created by @thho How to prepare Sentinel-1 images stack for PSI/SBAS in SNAP 5
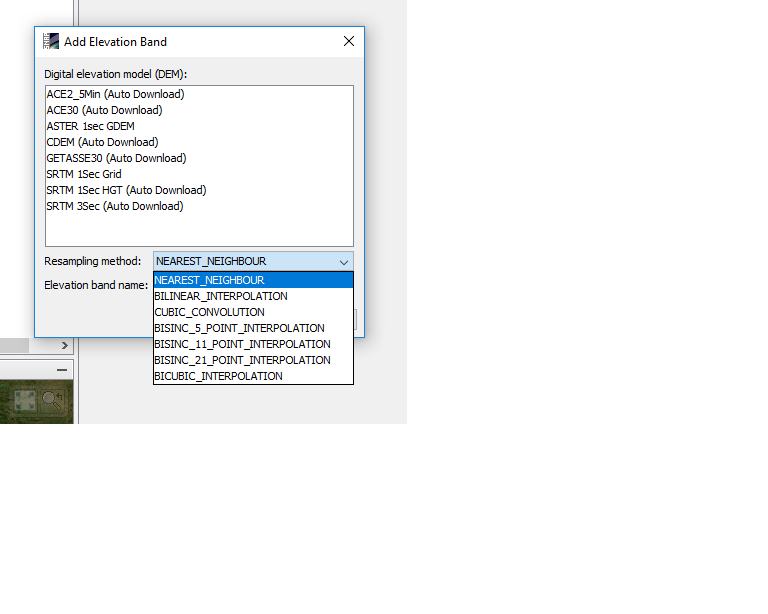
Good morning,
I am following all the step in order to export to StaMPS.
I am in the step when I have to add the elevation but I do not know how kind of resampling method I have to choose.
Following the options:
for contiuous surfaces NEarest Neighbor is probably not the most suitable because it can introduce ‘stairs’ in your DEM. So I would stick to bilinear as it smooths the surface a bit without altering the original values too much.
Thanks.
I have another problem.
After the elevation band I have to export to stamps but I have the following error:
What I have to do?
In the procedure that I have found, after the “add elevation band” I have only to export to stamps.
I have forgotten anything?
ok thank you very much. I’m going to try
I have exported the two product to stamps.
I have the 4 new directories and i have PS geocoded the Latitude and the Longitude.
But on this point I have a question.
When I export the new two band Lat and Lon, I obtain two of each one:
one file.hdr and one anther file.
I have copied the .hdr on the geo directory that I have obtained.
is it correct or I have to use the other one?
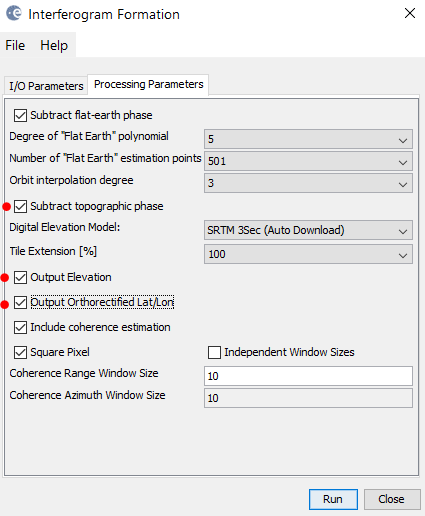
actually, if you create the interferograms with the checkboxes checked, there is no more need for copying or renaming files. The StaMPS export does the rest.
Ok thanks.
I have exported into stamps and I have deleted the PS geocoded.
I have put :
The following step is “run mt_prep_gamma” from the directory that contains the new 4 folder created after the Stamp export.
But…i don’t understand how I can do it.
If the “run mt_prep_gamma” is inside the Stamps bin directory, how can I run it from the other folder?
I am using cygwing in windows.
What I have to do?
Make yor scripts available for your shell and use tcsh at best.
You can enter the full path of your exported folder for running mt_prep_gamma_snap_changed.
Use the updated scripts provided by Katherine: About the STaMPS category
However, I wasn’t lucky with cygwin and had to switch to Linux, so I can’t help you for Windows solutions.
Thanks.
I have problem with my workmachine so I must use cygwin.
my problem is that i don’t understand what command I have to use in roder t run “mt_prep_gamma” and from wich directory I have to do it.
I have tried from the directory where I have the export and I have tried with this command:
mt_prep_gamma 20171207/cygdrive/e/new/roma/Stamps/INSAR_master_data/20171207 0.4 2 2 50 200
but the command is not found.
INSAR_master_data in where there are the new 4 directories obtained after the export.
Could you tell me where am I doing wrong?
Thanks