Cloud mask - SNAP sentinel 2

you could also try to define the valid pixel expression in the band properties. Something like “cloud_band == 0”)

Before

After

4 Likes

You absolute genius ! Thank you so much. I have been trying to figure this out for months. So if I export these bands now, will these cloud masks still apply?

2 Likes

Haven’t tested it but it would be worth a try.

If this doesn’t work: Have you tried checking “invert vector” in the land/sea mask operator?

Hello,
I have an output of Sen2Cor and I want to get rid of my cloud pixels.
I resampled the Sen2Cor output to have 60 m res for all bands. Then, in mask manager, I created a union of the cloud masks (high, medium, and low probability).
I tried Land/Sea Mask, use vector as mask, and to use union mask, I get the attached error. Is there a better way to do what I need to do? Am I doing something wrong here?

Hi,

I also want to create a cloud cover mask but I’m failing.
I have created a custom mask on the Band B1 that mask clouds with B1>0.19. Then I use the raster> mask>land/sea mask> under parameters tab: from drop down I selected the cloud mask I just created and saved the image as a GeoTIff. The script runs but when opening the GeoTiff in QGIS it return a black image with only nan values.
When running the same script but using the built-in opaque_cloud mask(10m) and the band B4, it works properly.

If I save as a BEAM-DIMAP it works, but it fails if I try to save as GeoTiff-BigTiff or simply GeoTif I get the following error message:


I am working with a product with only 1 band so I don’t understand what is going on here…

I then tried to save the BEAM-DIMAP product created as GeoTiff but it still create a black image with nan only.

Thanks!

try this.

Raster > Subset

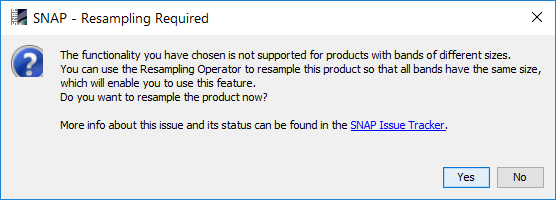
Select yes and run without any change.
Should be done in about one second

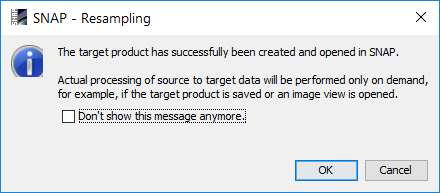
Open your your new (virtual) product > File > Export > GeoTiff (not GeoTiff/ BigTiff)
There select “Subset…” and choose your desired band in “band subset”.

Worked for me. Please also see my thoughts on virtual resampling:

Great, it worked thanks a lot!!
I first resampled then masked and export product. It also now works directly when applying the mask to save as Geotiff.

Now my problem is that the masked area (in white on the right) in the product/Geotiff created is much smaller than the actually mask on the initial product (in red on the left)

Where could that be coming from?

What values do the red (masked) areas have before exporting?
Could it be useful to first convert the Mask to Integer?
Raster > Data conversion > Convert datatype

The mask is set to B1>0.19.
I tried the data conversion but the mask doesn’t show up in the list… I can see only the built-in masks.

I found a solution by creating a new layer based on the mask using band maths and then applying the mask again on that band saving as GeoTiff.

1 Like

Hello,
I m using S2-L2A product.
I m interested on vegetation and bare soil only, and I d mask (set to NaN) the other classes.
How can I do that with all the bands together. With Band Math, I have to process one band a time.
Also, for filtering, I would filter all the band in the same time.
Thanks

That’s the way you have to do it. Use Band Math on each band. You can also create a graph XML file and use it on the command line.
You could also change the valid-pixel expression for each of the bands (select properties from the context menu of a band).
On the command line the Image-Filter operator could be used.

gpt Image-Filter -h

@marpet

Is it possible to calculate NDVI for L2A product using Band Math and on newly created NDVI band use Valid-Pixel Expression, for example, sci_high_cloud_proba == 0 (Pic.1) where High cloud probability pixels are given NaN values for NDVI (Pic.2)
Thank You in advance


What does it do? Should that be clear all the cloud on the map?We need a clear viewon the map so that we can compute NDWI and FAPAR.

Im using SNAP and I want to remove all the clouds for a better result of the map image to compute fapar and ndwi,but hiw can I get rid on the clouds?

Have a look at this thread:

Dear Stephanie, could you explain in more detail your solution. I have the same problem as you. I first created mask by union of several of the build-in masks. Then used that mask in the “Masks->Land/Sea Mask” tool to apply my mask to all Sentinel spectral bands at once (resampled in advance to common resolution) and saved the output as DIMAP. But the resulting images are all black with here and there values 1 or 0. How did you manage to resolve this problem? Many thanks in advance for your help.

Dear Petar,

I went back to my notes and below is what I did.

  1. Open the Sentinel level 2 product in SNAP (I used the version 5).
  2. Resample the product
    Raster/subset, click OK in the dialog box
    In the resampling parameter tab select the 1st option “by reference band” and select B1
    In the 1/0 tab: select “open in SNAP” only
  3. Create the mask based on band B1 (this was the one with higher contrast in my case)
    Use Mask manager with [x] based on value range. You will need to play around this one to find the value that works for you.
  4. Create a virtual band based on the mask
    Go to the mask tab in the product and right click on the one you just created
    Select “Band Maths” while keeping the default expression as is which will lead to the pixels under the cloud given a value of 255 while the rest will be set to NaN
  5. Apply the mask on the resampled product and export as GeoTIFF+xml
    Raster/Masks/Land/sea mask
    In the resampling parameter tab select"virtual band," and use “Vector as mask”, select your cloud mask
    In the 1/0 tab: select “save as GeoTIFF+xml”

Hopefully that should do the trick for you as well!

Best regards,

Stephanie

1 Like

Hi
I’m having problems with the tool Idepix Sentinel2 -MSI tool.

I’m processing a large number of images. All of them were processed in a batch with the following algorithms:

  • Subset to band2 pixel size
  • subset to the same geographical coordinates.

After this, if I apply Idepix tool gives me the following error:

Message: with(-2102) and height(-2102) must be > 0

The weird thing is that this message appear in some images, not in all the processed images. What could be the problem?

Thank!!

are your image L1C or L2A,?

Did you apply Idepix for each single one? Or Did you use batch?

Because not all your images have the error,