Back-GeocodingOp with multiple slaves in snappy

Hello,

at the moment I try to build multiple stacks of multiple SAR images. When using the GUI it is quiet easy to load Topsar Split and orbit file applied files into the Back-GeocodingOp the first one is the master image, to which all other images will be coregistered.
Doing this with snappy with two images looks something like this and it works just fine:

parameters = HashMap()
parameters.put('demName', "SRTM 3Sec")
parameters.put('demResamplingMethod', 'BICUBIC_INTERPOLATION')
parameters.put('resamplingType', 'BISINC_5_POINT_INTERPOLATION')
parameters.put('maskOutAreaWithoutElevation', True)
parameters.put('outputDerampDemodPhase', False)

mst = ProductIO.readProduct('path/to/mst.dim')
slv = ProductIO.readProduct('path/to/slv.dim') 

prodset = []
prodset.append(slv)
prodset.append(mst)

prodset_bgc = GPF.createProduct('Back-Geocoding', parameters, prodset) 


parameters_deb = HashMap()
parameters_deb.put('selectedPolarisations', 'VV')

prodset_bgc_dbrst = GPF.createProduct('TOPSAR-Deburst', parameters_deb, prodset_bgc)


outpath_bgc_dbrst = 'path/to/output.dim'

ProductIO.writeProduct(prodset_bgc_dbrst, outpath_bgc_dbrst, 'BEAM-DIMAP')

But now I want to add a second slave image therefore the stack will consists of 3 images mst, slv1 and slv2. I tried this, but it does not work:

...
mst = ProductIO.readProduct('path/to/mst.dim')
slv 1= ProductIO.readProduct('path/to/slv1.dim') 
slv 2= ProductIO.readProduct('path/to/slv2.dim') 

prodset = []
prodset.append(slv1)
prodset.append(slv2)
prodset.append(mst)

prodset_bgc = GPF.createProduct('Back-Geocoding', parameters, prodset) 
...

When I run this script there are two outcomes:

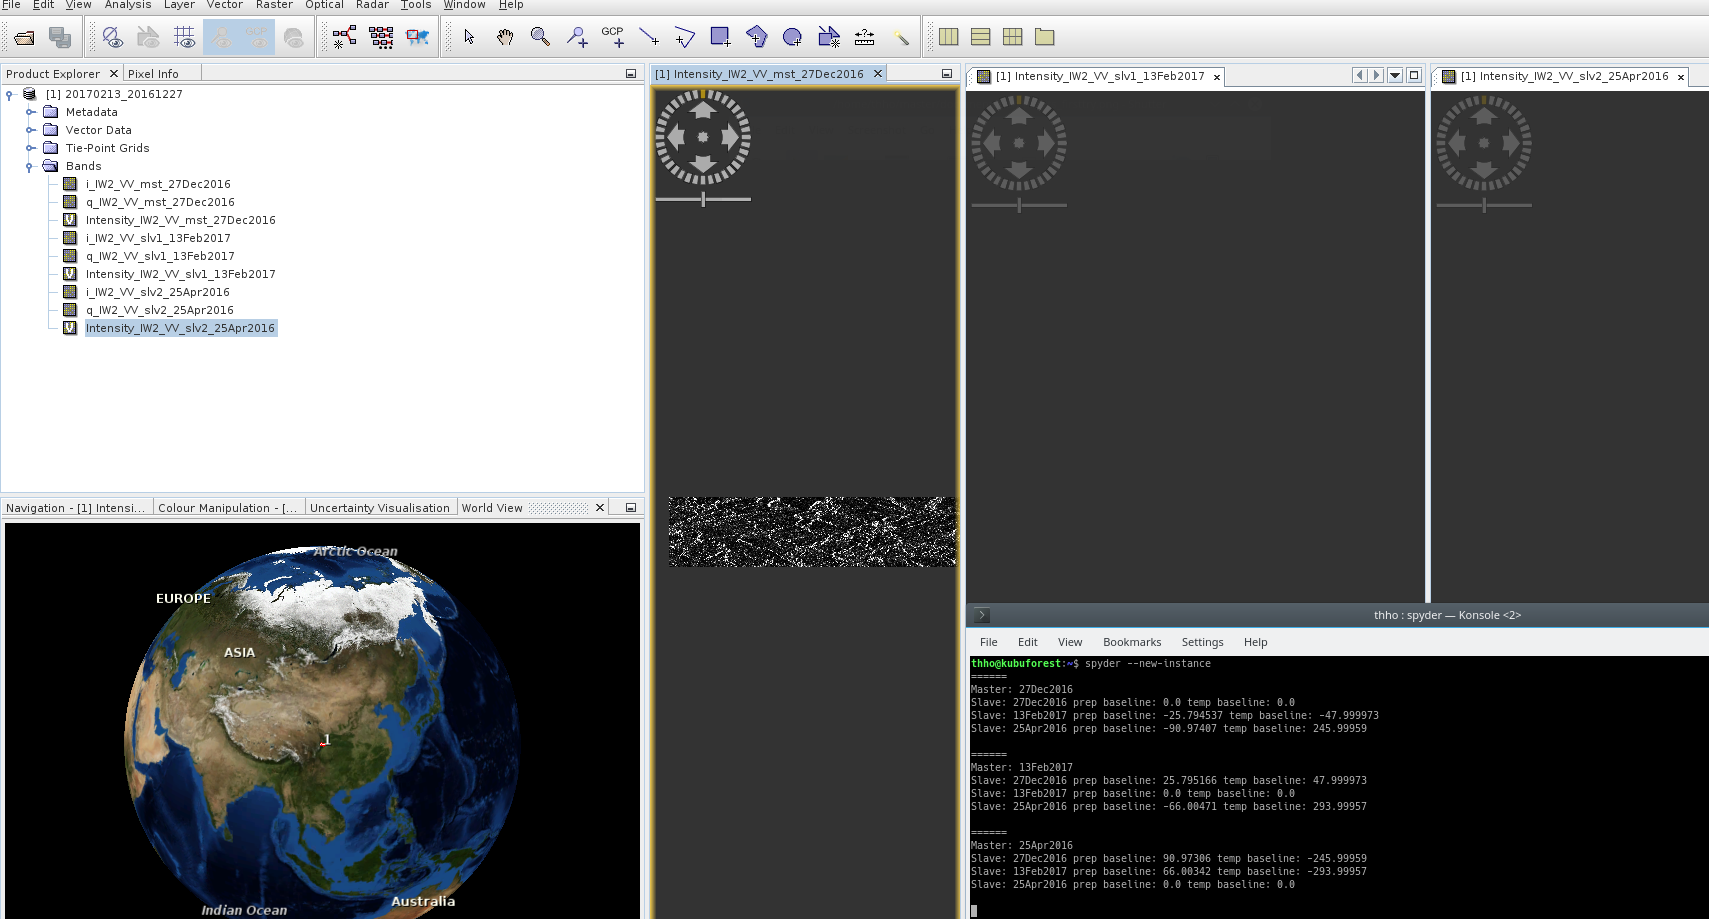
  1. the result is a stack but just one image is stacked and I can see the Intensity when checking in the GUI (see the screenshot, for some reason you have to scroll in and it is not clickable…)
  2. Another “result” is snappy works for hours but does not produce anything, there is no error. In my spyder Terminal these message can be seen (bottom right in the picture)

The picture shows also the output when generated, but as you can see just one intensity band is included in the stack, beside the band name, but there is no data in it…

Maybe I prepare prodset in a wrong way? I tried a lot to get this run, but until now I was not able to fix this Problem. Maybe @marpet or @juanesburgo (I have in mind that you once worked with snappy and back geocoding) have an idea how to handle this? The operator works fine when using the GUI but I have to create hundreds of stacks and the loop doing this is ready if the Op works in snappy. It would be really great when I get some help here :slight_smile:
Cheers
Thorsten

3 Likes

Update

I tried some things and finally I get a result. I did not run the given example of three images (1 mst and 2slv) I tried it with four and never finished the process. Now with three images I gave it some time, it took 29.5 minutes compared to SNAP GUI which needs 2.6 minutes. I thought about longer calculation with Python but really underestimated the duration…more as tenfold is somehow disillusioning…but still an automated workflow, which will help me to work without errors…
Anyway…It would be really helpful if someone could check why it takes that long in python and if there is any possibility to make this step faster. If you have any suggestions even use the operator in an other way, you are welcome!

2 Likes

Hey Thho,

Very interesting topic and it is cool that you time it for both (python & Snap GUI), regarding the prodset, can you append in it as much slaves as you want? Does really GPF create a product with a list of n slaves + 1 master or is there something else I should do?

Regarding the list prodset itself, why are you appending the master the last?

Best and congrats for yor work!
Joues

I think so but you will at some point run out of memory…my largest was a two burst 52 image stack I think

That is the output using the operator…does not change fpr snappy GUI or gpt

that is long time ago but when I recall right, master must be the same to be recognized as master image during the coreg step.

1 Like

Hey Thorsten, thanks for the answer, I have a back_geocoding function working (with 1 master and “n” slaves), but the only problem is the time. It takes +3 hours to process a single subswath for 3 products while in Snap GUI (20 min), did you get a fix for this?
I tried several ways but I couldn’t. Waiting 3 hours is excesive, is there any fix for that?

Best regards,
Joues

P.D.: Maybe @marpet or @ABraun know about this disproportionately slowness in Snappy for the back-geocoding.

Java will be faster than SNAPpy for the foreseeable future - you could set up the parameters of your graph using Python and run it with gpt. Perhaps not the most elegant solution but if performance matters it’s the way to go…

Makes sense, but Snappy operations like subswath, deburst, etc. are as faster as in Snap, what happens with, specifically, back-geocoding is surprisingly slow… maybe there is a fix…

Use GPT like this…

#!/bin/bash
# enable next line for debugging purpose
# set -x 

############################################
# User Configuration
############################################

# adapt this path to your needs
export PATH=~/snap/bin:$PATH
gptPath="gpt"
  
############################################
# Main processing
############################################
projectDirectory="$PWD"
graphXmlPath="${projectDirectory}/back_geoc_srtm.xml"
oaDirectory="${projectDirectory}/spl_oa" #data with TOPSAR split and orbit file apllied
master="$(cat ${projectDirectory}/master.txt)" #a txt file holding the name of the master image withput file extension
slave="$(cat ${projectDirectory}/slave.txt)" #a txt file holding the names of the slave images with file extension like this: slave1.dim,slave2.dim,slave3.dim
mv -R ${projectDirectory}/spl_oa/$master* ${projectDirectory}/master/ #the folder master should exist
mstpath="${projectDirectory}/master/$master.dim"
dbDirectory="${projectDirectory}/stack_deb"

cd "${projectDirectory}"

fileList="${mstpath},${slave}"
targetFile="$dbDirectory/${master}_back_geocode_stack.dim"
echo "fileList=$fileList">back_geoc_sbas_srtm.properties
echo "file=$targetFile">>back_geoc_sbas_srtm.properties
parameterFilePath="$projectDirectory/back_geoc_srtm.properties"
${gptPath} ${graphXmlPath} -e -p ${parameterFilePath}

I changed some code I wrote and tried to make it as clear as possible but quick :wink: you have to check if all relative paths work out…your starting point is a dir of your choice which will be the projectDirectory in this workflow. Hope it helps…you can also build a for loop around that to do multiple stacks (that is what I have done)

2 Likes

here is the graph

<graph id="back_geoc_sbas">
  <version>1.0</version>
    <node id="ProductSet-Reader">
    <operator>ProductSet-Reader</operator>
    <sources/>
    <parameters class="com.bc.ceres.binding.dom.XppDomElement">
      <fileList>${fileList}</fileList>
    </parameters>
  </node>
  <node id="Back-Geocoding">
    <operator>Back-Geocoding</operator>
    <sources>
      <sourceProduct.3 refid="ProductSet-Reader"/>
    </sources>
    <parameters class="com.bc.ceres.binding.dom.XppDomElement">
      <demName>SRTM 3Sec</demName>
      <demResamplingMethod>BICUBIC_INTERPOLATION</demResamplingMethod>
      <externalDEMFile/>
      <externalDEMNoDataValue>0.0</externalDEMNoDataValue>
      <resamplingType>BISINC_5_POINT_INTERPOLATION</resamplingType>
      <maskOutAreaWithoutElevation>true</maskOutAreaWithoutElevation>
      <outputRangeAzimuthOffset>false</outputRangeAzimuthOffset>
      <outputDerampDemodPhase>false</outputDerampDemodPhase>
      <disableReramp>false</disableReramp>
    </parameters>
  </node>
  <node id="TOPSAR-Deburst">
    <operator>TOPSAR-Deburst</operator>
    <sources>
      <sourceProduct refid="Back-Geocoding"/>
    </sources>
    <parameters class="com.bc.ceres.binding.dom.XppDomElement">
      <selectedPolarisations/>
    </parameters>
  </node>
  <node id="Write">
    <operator>Write</operator>
    <sources>
      <sourceProduct refid="TOPSAR-Deburst"/>
    </sources>
    <parameters class="com.bc.ceres.binding.dom.XppDomElement">
      <file>${file}</file>
      <formatName>BEAM-DIMAP</formatName>
    </parameters>
  </node>
</graph>

1 Like

or do it like this :wink: maybe more elegant or closer to your needs…I found it quite comfortable to handle file names and stuff via Bash, building propertie fiels for the GPT graph with it and then simply call the graph using this file. Quite scaleable when implementing for loops…

1 Like

Thanks a lot Throsten!

I am mostly working with Snappy, using python as kind of glue for the Snappy operators. My goal is to automate coregistration and interferometry, so you can imagine that my script is quite messy. It does the job, but went I enter to back-geocoding it takes hours.

#FIRST CASE: 1 master, n slaves in a single product
product_mas, __, unique_id_mas = s1_charge_data(mas_path, i_debug = False)
product_grouped = []
product_grouped.append(product_mas)

for path in slvs_path:
    product, __, __ = s1_charge_data(path, i_debug = False)
    product_grouped.append(product)

input_parameters = ""
input_parameters = HashMap()
input_parameters.put("demName", DEM) 
input_parameters.put("DEM Resampling Method", 'BILINEAR_INTERPOLATION')
input_parameters.put("Resampling Type", 'BILINEAR_INTERPOLATION')
input_parameters.put('Mask out areas with no elevation', True)
input_parameters.put('Output Deramp and Demod Phase', False)

if i_debug == True: print '######### Creating Product #########'
if i_debug == True: print ''

output_back_geo = GPF.createProduct('Back-Geocoding', input_parameters, product_grouped)

if i_debug == True: print '######### Product Created #########'

ProductIO.writeProduct(output_back_geo, back_geo_path, out_format)
if i_debug == True: print ''
if i_debug == True: print 'Output geometry corrected product is: ', back_geo_path

As you can see I debug when generating and storing the product. What makes it slower is the ProductIO.writeProduct function. I think that since it is writing more than 2 products, it increases exponentially the computational cost of the operation, given the nature of Snappy.

Is there maybe another way to use ProductIO?? Am I doing it wrong?
Thanks a lot!

hmm for me the way you use it looks fine…still as @mengdahl said snappy is slow and it depends which OP are providing the file to be written (My intuition) since Back Geocoding is very intensive and Snappy not parallelized as Java, there is no work around…

I was there too…I am glad that I changed to GPT much faster, much more straight forward…I just use snappy when maipulating some things in metadata or use special options which are not provided in gpt…but for back geocoding gpt is the way to go!

1 Like

Thanks a lot for your help, my feeling is the same. Perhaps @marpet can gain awareness on how Snappy Back-Geocoding works with the py27-py34 version and check if it can be fixed for the next relevant release of Snappy.

best!
Joues