MODIS L1C time information for C2RCC

Good Day.

I’m trying to generate C2RCC products using MODIS. I generated MODIS L1C through l2gen with l2prod=latitude longitude polcor* rhot* sena senz sola solz (*visible and NIR bands). However, when I tried to input the generated L1C.nc product to C2RCC, I got this error:

Message: Could not retrieve time information from source product

What product in the product selector should I add in order to take into account the time information, or how should I correct this error?

In the user help you can find a brief description on how to create the L1C data.

If you follow this it should actually work.

That is what I exactly followed except for polcor_nnn because it defaulted to polcor_iii and polcor_vvv. So instead I included in the product polcor_vvv and the rest of polcor for NIR. Same was done for rhot.

Like I said previously, I was able to generate MODIS L1C data, however when I processed it with C2RCC, it said that no time information is included; therefore, failing product initialization.

What should I look for in the products tab of l2gen in order to take into account the time information for MODIS L1C?

Which version of l2gen do you use? Maybe something changed.
I’m not aware that for time information something special was needed to be done.
Honestly, I haven’t really used it only for testing and it is some time ago. I will ask some colleagues who used the C2RCC for Modis more often. Maybe they know something.

I just recently installed it. I’m using l2gen on SeaDAS 8.0.0 on Ubuntu 16.04.7.

Thank you. It seems that some parameters of the processor were updated as simply following the “Create MODIS L1C” guide resulted to some errors (ex. polcor_nnn defaulting to polcor_iii and polcor_vvv). Highly appreciate the help.

Related discussion also takes place in the SeaDAS Forum:

I tried to do the whole processing chain, from L1A to C2RCC: the first issue appears when converting from L1B to L1C. I had a .GEO file, it is necessary when you pass from L1A to L1B. My l2gen products do not include “latitude” and “longitude”, but it is not a problem since I have my GEO. Second issue, and this is key, l2gen does not produce “rhot” from band 678, that means that C2RCC cannot be applied since some bands are missing (like 748). I could not proceed applying C2RCC to my L1C.nc data.

(In the image the *_LAC_OC should be the L1C.nc, I forgot to change the name in this example
)

I can address NASA SeaDAS-OCSSW l2gen. Yes for MODIS L1B files you also need the associated GEO file as input to l2gen.

To get the near-infrared bands like 748, etc., use the following line in l2gen:
l2prod=polcor_1240 polcor_1640 polcor_2130 polcor_748 polcor_859 polcor_869 polcor_vvv rhot_1240 rhot_1640 rhot_2130 rhot_748 rhot_859 rhot_869 rhot_vvv sena senz sola solz

Note: the “vvv” is a shortcut for all visible bands. “nnn” is a shortcut for all bands. “iii” is a shortcut for all infrared bands.

Also note the above line can be built within the l2gen GUI by clicking on the desired products/wavelengths in the “Products” tab.

If you want a simpler expression you could use the following, but you’ll get all the rhot infrared bands which you might not need.
l2prod=polcor_1240 polcor_1640 polcor_2130 polcor_748 polcor_859 polcor_869 polcor_vvv rhot_nnn sena senz sola solz

However don’t use polcor_nnn as the polcor algorithm fails for infrared bands.

1 Like

It is still not working for me. I am using the GUI, I copy/paste the #PRODUCTS as @knowles indicated, but when I press run, it changes suddenly to the default values and the bands from 748 on are not created. It is the same when I try to write rhot_nnn, it is changed to rhot_vvv

Which version of SeaDAS are you using?

If you are pasting into the text box within the PRODUCTS tab, then you must hit “Apply”. It’s the only way for the GUI to know whether you are using the textfield or the tree selector.

If you are pasting into the text box within the “MAIN” tab then hitting the "Apply button is not necessary.

I am using the Seadas 8.0.0 version (under Linux Mint)
I tried both options, change the text in Products and in Main.
Nothing works, I made a short video pasting the text box within the MAIN tab and it is possible to see how it changes before starting processing (but it is too heavy to upload it here).
I guess this can be done from command line, I have not tried that.

SeaDAS 8.0.0 is a Beta release version. The good news is that you have identified a bug which we missed, so we can work on fixing it. The bad news is that it is a bug and custom wavelengths cannot be set in the SeaDAS 8.0.0 GUI. SeaDAS 7.5.3 doesn’t have this bug. We will look into this, and the fix will be in the next SeaDAS 8 release.

If you wish to install SeaDAS 7.5.3 then you can run l2gen from that GUI with custom wavelengths.

If you wish to run from the command line, then the simplest way is to create the parfile within the l2gen GUI and then click “Save Parameters”, writing to a file: for example “parfile.txt”. You will then need to edit “parfile.txt” to set the desired custom wavelengths. Then at the command line run “l2gen par=parfile.txt”.

Note when running any seadas-ocssw processor from the command line you need the following 2 lines in your ~/.bash_profile
export OCSSWROOT=[The directory where the ocssw processors are installed]
source $OCSSWROOT/OCSSW_bash.env

1 Like

The command-line often makes it easier to discover the reason something doesn’t work, and you can paste details into a post so it is easy for others to reproduce the problem. I’m not sure if you are doing standard C2RCC processing or have some special requirements, but it is often helpful to start with a basic example following the SNAP Help pages.

I was able to process A2009246231500.L1A_LAC (the file used for the examples in the SNAP Help) using the current OCSSW software and following the Help documentation.

Note that the % is my zsh prompt – you may be using bash which will give a $ prompt:

 % modis_GEO -v A2009246231500.L1A_LAC 
** Files utcpole.dat/leapsec.dat are more than 2 weeks old.
** Running update_luts.py to update files...
[...]
eogen_modis returned with exit status: 0
Percentage of pixels with missing geolocation: 0.00
Validation test passed for geolocation file A2009246231500.GEO
geogen_modis created A2009246231500.GEO successfully!
MODIS geolocation processing complete.
 % modis_L1B A2009246231500.L1A_LAC 
MODIS Aqua L1B version 6.2.1_obpg, built Jan 26 2021 14:56:49
scan: 0 out of 203 Wed Apr 21 14:50:07 2021
[...]
scan: 200 out of 203 Wed Apr 21 14:50:18 2021
gwhite@cerberus ~/Documents/ESA_SNAP/C2RCC
 % l2gen par=L1C.par                  
Input file A2009246231500.L1B_LAC is MODIS Aqua Level-1B HDF-EOS product.
[...]
Percentage of pixels flagged:
Flag # 1:          ATMFAIL          0   0.0000
Flag # 2:             LAND       3006   0.1094
Flag # 3:         PRODWARN          0   0.0000
Flag # 4:          HIGLINT     540178  19.6527
Flag # 5:             HILT    1130435  41.1274
Flag # 6:         HISATZEN     188459   6.8565
Flag # 7:           COASTZ        486   0.0177
Flag # 8:            SPARE          0   0.0000
Flag # 9:       STRAYLIGHT     950625  34.5855
Flag #10:           CLDICE    1553519  56.5200
Flag #11:        COCCOLITH          0   0.0000
Flag #12:          TURBIDW          0   0.0000
Flag #13:         HISOLZEN          0   0.0000
Flag #14:            SPARE          0   0.0000
Flag #15:            LOWLW          0   0.0000
Flag #16:          CHLFAIL          0   0.0000
Flag #17:          NAVWARN          0   0.0000
Flag #18:           ABSAER          0   0.0000
Flag #19:            SPARE          0   0.0000
Flag #20:       MAXAERITER          0   0.0000
Flag #21:         MODGLINT    1116643  40.6256
Flag #22:          CHLWARN          0   0.0000
Flag #23:          ATMWARN          0   0.0000
Flag #24:            SPARE          0   0.0000
Flag #25:           SEAICE          0   0.0000
Flag #26:          NAVFAIL          0   0.0000
Flag #27:           FILTER          0   0.0000
Flag #28:            SPARE          0   0.0000
Flag #29:        BOWTIEDEL          0   0.0000
Flag #30:            HIPOL     144971   5.2743
Flag #31:         PRODFAIL          0   0.0000
Flag #32:            SPARE          0   0.0000

End MSl12 processing at 2021111150623000
Processing Rate = 21.827957 scans/sec

Processing Completed

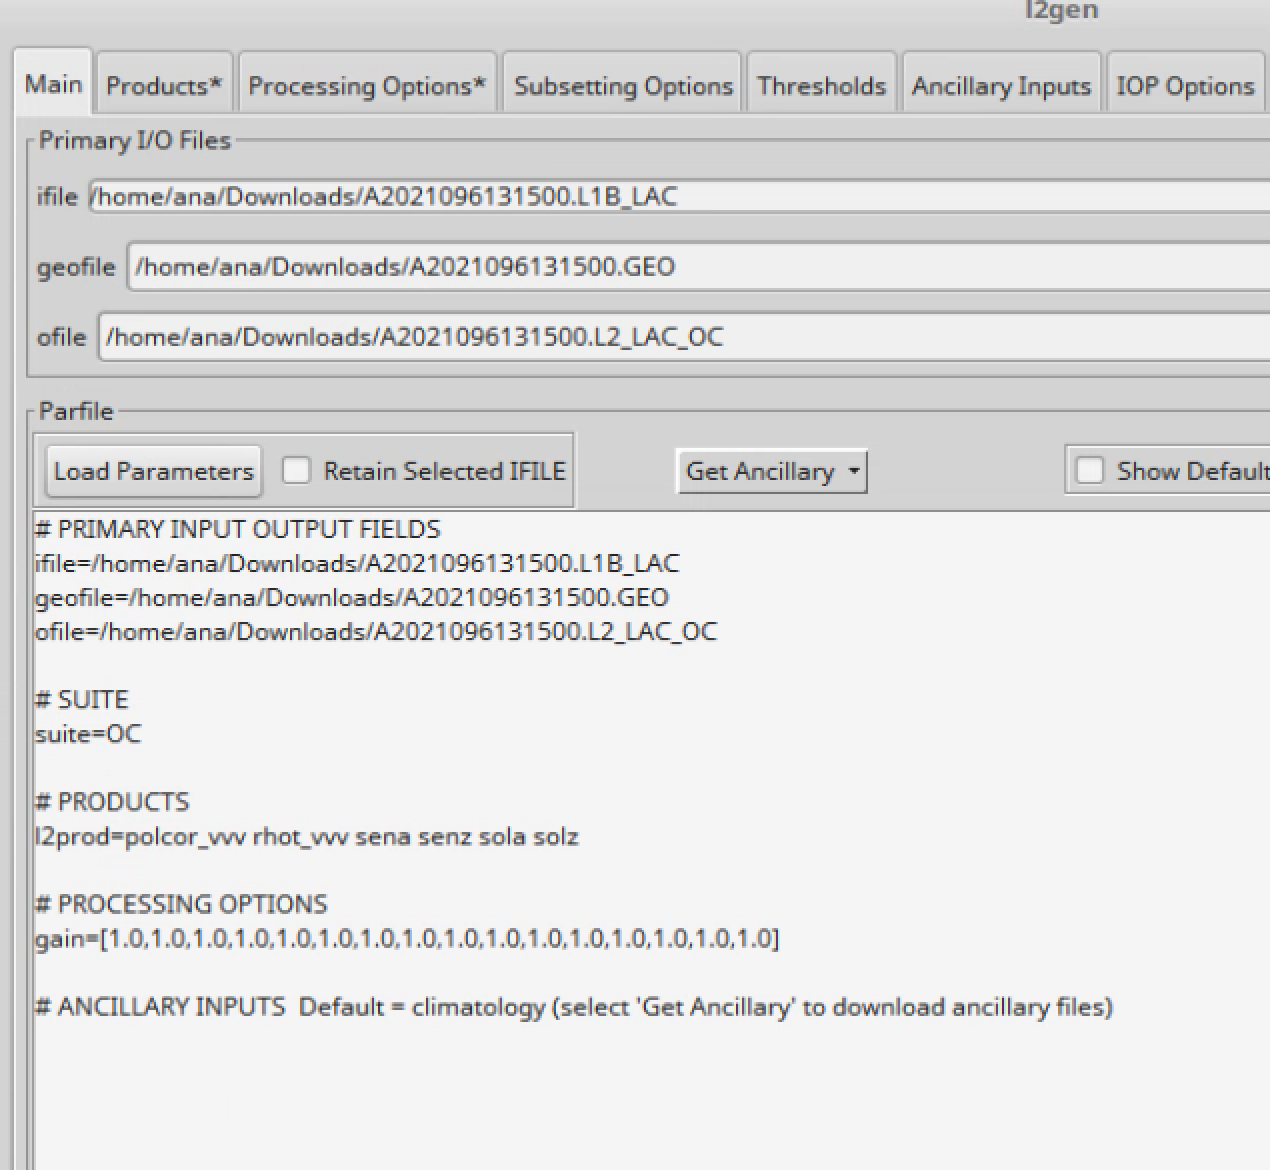
The par file was copied from the Help pages:

% cat L1C.par 
ifile=A2009246231500.L1B_LAC
geofile=A2009246231500.GEO
ofile=A2009246231500.L1C.nc
suite=OC
l2prod=latitude longitude polcor_nnn rhot_nnn sena senz sola solz
gain=[1.0,1.0,1.0,1.0,1.0,1.0,1.0,1.0,1.0,1.0,1.0,1.0,1.0,1.0,1.0,1.0]
atmocor=off

I was able to use the GUI default setting to get A2009246231500.L1C.nc_C2RCC.dim. The metadata
has:

        <PRODUCT_SCENE_RASTER_START_TIME>03-SEP-2009 23:20:00.253000</PRODUCT
_SCENE_RASTER_START_TIME>
        <PRODUCT_SCENE_RASTER_STOP_TIME>03-SEP-2009 23:15:01.877000</PRODUCT_
SCENE_RASTER_STOP_TIME>
[...]
                <MDATTR name="time_coverage_start" type="ascii">2009-09-03T23:15:01.877Z</MDATTR>
                <MDATTR name="time_coverage_end" type="ascii">2009-09-03T23:20:00.253Z</MDATTR>

I also ran with the parameters changed to include the angles:

<parameters>
    <validPixelExpression>!(l2_flags.LAND ||  max(rhot_412,max(rhot_443,max(rhot_488,max(rhot_531,max(rhot_547,max(rhot_555,max(rhot_667,max(rhot_678,max(rhot_748,rhot_869)))))))))>0.25)</validPixelExpression>
    <salinity>35.0</salinity>
    <temperature>15.0</temperature>
    <ozone>330.0</ozone>
    <press>1000.0</press>
    <outputRtosa>false</outputRtosa>
    <outputAsRrs>false</outputAsRrs>
    <outputAngles>true</outputAngles>
</parameters>

On the command line (using default output:target.dim, the % character is the zsh prompt; bash uses $):

 % gpt C2RCC -e -SsourceProduct=A2009246231500.L1C.nc \
-PsensorName=modis \
-PvalidPixelExpression='!(l2_flags.LAND ||  max(rhot_412,max(rhot_443,max(rhot_488,max(rhot_531,max(rhot_547,max(rhot_555,max(rhot_667,max(rhot_678,max(rhot_748,rhot_869)))))))))>0.25)' \
-Psalinity=35.0 \
-Ptemperature=15.0 \
-Pozone=330.0 \
-Ppress=1000.0 
INFO: org.esa.snap.c\
ore.gpf.operators.tooladapter.ToolAdapterIO: Initializing external tool adapters
INFO: org.esa.s2tbx.dataio.gdal.GDALVersion: Incompatible GDAL 3.1.4 found on system. Internal GDAL 3.0.0 from distribution will be used.
INFO: org.esa.s2tbx.dataio.gdal.GDALVersion: Internal GDAL 3.0.0 set to be used by SNAP.
INFO: org.esa.snap.core.util.EngineVersionCheckActivator: Please check regularly for new updates for the best SNAP experience.
INFO: org.esa.s2tbx.dataio.gdal.GDALVersion: Internal GDAL 3.0.0 set to be used by SNAP.
INFO: org.hsqldb.persist.Logger: dataFileCache open start
Executing operator...
20%....30%....40%....50%....60%....70%....80%....90%.... done.
INFO: org.esa.snap.core.gpf.common.WriteOp: Start writing product c2rcc.modis$178F64B7F0E to target.dim
Writing...
10%INFO: org.esa.s3tbx.c2rcc.ancillary.AtmosphericAuxdataBuilder: Atmospheric auxdata product can't be used. At least one is not specified. Using constant values for ozone (330.0) and surface pressure (1000.0).
20%40%....50%....60%....70%....80%....90%....100%....110%.... done.
INFO: org.esa.snap.core.gpf.common.WriteOp: End writing product target to target.dim
INFO: org.esa.snap.core.gpf.common.WriteOp: Time: 18.076 s total,  8.904 ms per line, 0.006576 ms per pixel
1 Like

Hello.

I tried to run an ocssw command in the terminal, however, I got this error:

torres609@torres609:~/SeaDAS/ocssw/bin$ ./modis_GEO /home/torres609/Downloads/A2009023054500.L1A_LAC -v
Neither the L2GEN_ANC nor USER_L2GEN_ANC environment variables are set.
...using the current working directory for ancillary file download.
Error! Unable to locate LIB3_BIN environment variable. You may need to run

What path should I set for L2GEN_ANC or LIB3_BIN?

Moreover, is there a way to batch process images in the SeaDAS GUI or is it just through the command line?

Hi @torres6 this question is probably better placed in the SeaDas forum.
But if Danny would like to answer, I wouldn’t mind. :slight_smile:

1 Like

The OCSSW tools downloads page asks you to set the OCSSWROOT variable in your ~/.bashrc and source a file that sets a long list of environment variables including L2GEN_ANC (USER_L2GEN_ANC is optional). In your case:

export OCSSWROOT="$HOME/SeaDAS/ocssw"
source "$OCSSWROOT/OCSSW_bash.env"

This can have unintended side effects when the 3rd party tools in $OCSSWROOT/opt/bin differ from the ones provided by your linux distro. In particular, the configuration of some netcdf and hdf tools and proj may differ from linux distro versions. To avoid these conflicts, you can omit the source line and use the ocssw_runner script (this is what the SeaDAS GUI uses), e.g.:

$ OCSSWROOT/bin/ocssw_runner l2gen ...

If all this isn’t comfortable for you, it will be well worth a spending a few days wir links to command-line learning material.

The SNAP and SeaDAS GUI’s are very useful, but, as you have found, they don’t handle every use case smoothly. The command line (terminal) is very useful both for debugging problems and for batch processing.

1 Like

For SeaDAS-OCSSW specific questions it is best to use the SeaDAS FORUM which is well monitored by SeaDAS developers and SeaDAS users.

@gnwiii answered the first part quite helpfully.

The 2nd part about batch processes… Each SeaDAS-OCSSW GUI runs a specific processor. There is the SeaDAS-OCSSW multilevel-processor, which can be considered a batch process. It can take a text file as input which contains a listing of multiple files. You then specify the processors to run. For instance if you have 100 MODIS l1a files which you wish to process to level2 using the same parameters applied to each, you could do this.

Apologies, let me take this opportunity for a follow-up question.

So how do I access this multilevel-processor? Do I just use said text file as an input in the processors?

I think this will suffice as I use the same parameters for each.

Thank you.

SeaDAS multilevel processor help page. Unfortunately, the multilevel processor appears to be limited to OCSSW programs, so I think your gpt C2RCC... step may still need to use the command line. Linux shell programs such as bash can also be used to run gpt on a list of files. That will look something like:

$ for sourceProduct in $(cat sourceProducts.list) ; do
  gpt C2RCC -e -SsourceProduct="$sourceProduct" -t "${sourceProduct%.nc}.dim" ...
done

but you should not attempt this until you have learned enough about the linux command line so you understand how it works.

If you have access to high-end hardware the GNU parallel program can often be used to process lists of files much more quickly than if you only process one file at a time, Many sites with large systems provide tools to manage batch processes.

Okay I’ve resolved this issue and it’s not actually a bug regarding being able to use l2gen GUI with the following parameter string:
l2prod=polcor_1240 polcor_1640 polcor_2130 polcor_748 polcor_859 polcor_869 polcor_vvv rhot_1240 rhot_1640 rhot_2130 rhot_748 rhot_859 rhot_869 rhot_vvv sena senz sola solz

Currently the defaults for “permissible” wavelengths in rhot and polcor is set to “Visible” bands. We may need to adjust this in future releases.

However to get this working right now you can manually set this value yourself.

Edit the file ~/.seadas8/l2gen/productInfo.xml (if the file does not exist then launch the l2gen GUI and load an ifile and productInfo.xml will be created)

Find the lines for rhot and polcor and set parameterType to “All” instead of “Visible”. Then the next time you launch SeaDAS these will be the l2gen default “permissible” wavelengths for the respective products.

So the relevant sections of the file will look like this:

<product name="rhot">
    <algorithm>
        <prefix>rhot_</prefix>
        <suffix></suffix>
        <parameterType>All</parameterType>
        <dataType>FLOAT32</dataType>
        <units>dimensionless</units>
        <description>Top-of-atmosphere reflectance at 0 nm</description>
    </algorithm>
</product>

<product name="polcor">
    <algorithm>
        <prefix>polcor_</prefix>
        <suffix></suffix>
        <parameterType>All</parameterType>
        <dataType>FLOAT32</dataType>
        <units>dimensionless</units>
        <description>Polarization correction at 0 nm</description>
    </algorithm>
</product>
2 Likes